Nested IF statements are when you have an IF statement inside an IF statement. I personally still find them a little difficult to understand, but they’re useful for when you only want to use one calculation. On the other hand, however, sometimes the convenience of one calculated field isn’t worth the inconvenience it could cause for whoever inherits your work (difficult to understand) or for yourself in the future, if you ever need to revisit it to troubleshoot something (difficult to parse out the part giving you trouble). They’re also not great for dashboard performance if you have millions and millions of rows because a simple IF statement runs through each row once; a nested one will run through it twice.
Still, this is a blog for learning, which is why I was excited to see the colleague who was helping me write the calculated field to account for all the conditions (i.e., what will happen when switching between seeing the overall number of breaches over time and seeing the breakdown by breach type) writing this nested IF statement, as I’d never really worked with one before.
Tree Diagram Example
To understand nested IF statements, I think of a tree diagram, where we start with two conditions that then branch off into more conditions based off of the very first one. For example, let’s start off with a simple, not-quite-real-life example of deciding on a hobby:
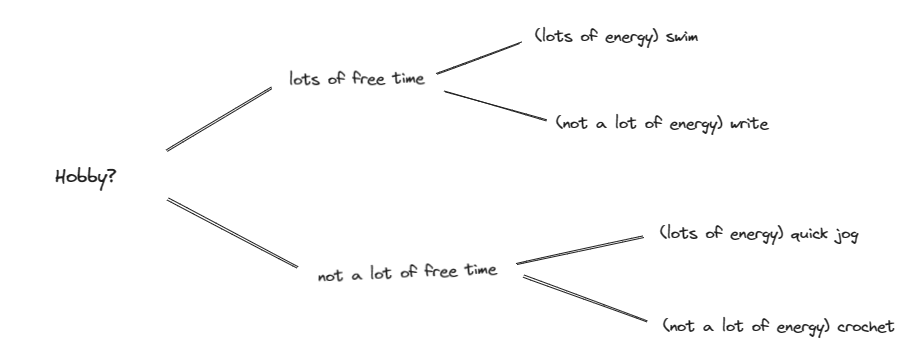
In this case, choosing a hobby will primarily depend on how much free time I have. If I have a lot of free time, that brings me to two paths that are exclusive to having a lot of free time: swimming or writing, though it’ll depend on how much energy I have to go for one activity over another. If I don’t have a lot of free time, then I’ll have two other choices that will also be exclusive to only the “not a lot of free time” path.
Once More Unto the (HIPAA) Breach Example
Let’s go back to the nested IF statement from my last blog post, which was used in selecting a point via a parameter action:
IF [All Breaches or Type of Breach Parameter] = "All"
THEN
IF YEAR([Breach Submission Date]) = YEAR([Parameters].[Selected Year])
THEN {FIXED YEAR([Breach Submission Date]):
COUNT([Name of Covered Entity])}
END
ELSEIF [All Breaches or Type of Breach Parameter] = "By Type"
THEN
IF YEAR([Breach Submission Date]) = YEAR([Parameters].[Selected Year])
AND [COLOR: All Breaches or Type of Breach] = TRUE
THEN {FIXED YEAR([Breach Submission Date]) ,
[Type of Breach (group)]:
COUNT([Name of Covered Entity])}
END
END
Huh?
Drawing It Out
Some people suggest reading these from the inside and working your way out. I personally prefer to go from the outside, so that I know the two (or more) major paths, and draw out each of the paths (or branches) to keep track.

To make things simpler for myself, I like to strip out the “IF” and “END” bits of the syntax; I’ll add those back in later. I do keep the “THEN” in there, to make it clear that that’s what the output for each condition will be. You’ll also notice that arrows precede the “THEN”’s—that’s another way I indicate to myself that that’s what will be returned for each condition.
You’ll also notice that each of the two major paths for the two values of the All Breaches or Type of Breach Parameter has a light gray second path that just says (ELSE null). Even though they’re not written out explicitly, as Tableau will know what to do without it being explicitly written, I write them out for myself when I’m drawing it out to better understand all possible outcomes. In this case, if it doesn’t meet the specified condition above the corresponding gray path, then there just won’t be an output (null).
1. First Path (or Branch) of the Nested IF Statement
Let’s look at just the first part of this, for when the parameter is set to “All,” i.e., showing the overall number of breaches over time:

We have one specified condition here:
YEAR([Breach Submission Date]) = YEAR([Parameters].[Selected Year])
This says if the year the breaches occurred/were reported matches the year specified in our Selected Year Parameter, whenever this is true, which is only once, give us the number of breaches for that year:
THEN {FIXED YEAR([Breach Submission Date]): COUNT([Name of Covered Entity])}
(Again, we have to write it as a FIXED LOD expression because we cannot mix aggregates—COUNT()—with non-aggregates (the part following the IF).)
Thus, if we specify the year ‘2020’ in our parameter, only the breaches that occurred in 2020 will be counted and given back to us. This part of the nested IF statement accounts for when we’re seeing all the breaches over time together and pick a point:

The implicit ELSE NULL that isn’t written in the expression translates basically into saying, otherwise, if the data doesn’t match the specified condition, don’t show it to us at all, which allows for us to show that one point only.
2. Second Path (or Branch) of the Nested IF Statement
Moving on to the second major condition of this example:

This is what we want to happen when the parameter is set to “By Type,” which breaks down our view of the number of breaches over time by the breach type. The condition specified here is:
YEAR([Breach Submission Date]) = YEAR([Parameters].[Selected Year]) AND
[COLOR: All Breaches or Type of Breach] = TRUE
This condition starts out very similar to when the parameter is set to “All”; we want the year the breaches occurred/were reported to match the year specified in our Selected Year Parameter. However, because we’ve now introduced another layer of complexity with the breach types breaking down the sole line from before into multiple ones, we also want to make sure that just one point and one point only will show up, so we need it to show up only for the line that is blue (hence adding in the second part of this condition with the [COLOR: All Breaches or Type of Breach] calculated field needing to be true, which is colored in blue).
When the parameter is set to “All,” the one line that’s present is blue, no need to specify anything else. When the parameter is set to “By Type,” we need to narrow down the one blue line out of the multiple lines present, so that we’re selecting only one point on that blue line, and we do that by specifying two criteria: the year the breaches occurred/were reported and the type of breach specified by another parameter already discussed in previous blog posts (drill-down with parameter action: 1, 2).
When these two criteria are met, that’s when we can ask Tableau to give us the number of breaches that happened in that year, of that particular type, with a similar FIXED LOD expression to earlier:
THEN {FIXED YEAR([Breach Submission Date], [Type of Breach (group)]): COUNT([Name of Covered Entity])}
The only difference here is that we’ve added in an extra criterion in the grouping part of the FIXED LOD expression, which is also the same criterion we added for the condition that has to be met—the type of breach. Otherwise, Tableau would return the same number of breaches to us as when we’re just looking at the overall number of breaches over time, which wouldn’t make sense when we’re viewing the breakdown.
By narrowing down which point on which line, we can now make this component of the view possible:

Writing a Nested IF Statement
When in doubt, draw it out! I definitely recommend drawing a tree diagram like I did above to plan out the expression, even if you are well-versed in writing logical expressions. That’s because with nested IF statements especially, it’s particularly easy for you to lose track of which conditions you’ve already accounted for and where you’re going next.
Once you’ve gotten all your conditions drawn out, only then would I feel comfortable creating the calculated field. It’s up to you how you want to bring in your IFs and ENDs (as I don’t include those when I’m drawing them out, for simplicity’s sake), but I like to start with writing the first major path out and closing it with an END to make sure that’s written properly before adding in the second path. I also use line breaks to keep track of where one condition ends and the next one starts.
For example, if we return to our not-quite-real-world example:
I’d start with the first major path, which is having lots of free time:
I’d then convert what I’ve written in plain language into code. For example, “lots of free time” could mean having more than two hours, which would be written as [Free Time] > 2 Hours for Tableau. This isn’t following Tableau syntax to a tee because I don’t have data for it, but hopefully this helps you make sense of how I would go about writing a nested IF statement.
Once I’ve converted all the parts of the tree diagram for this path/branch into code, then I’ll start writing out the proper syntax for an IF statement and pasting in the code conversions:
IF [Free Time] > 2 Hours
THEN
IF [Energy] = “A Lot”
THEN “Swim”
ELSEIF [Energy] = “Not a Lot”
THEN “Write”
END
END
I’ll put in the final END at this time as well, so that I don’t end up forgetting to and running into an error later.
Then, I’ll go into the second part (the part I wrote above will be in italics to differentiate from what I’m adding in now):
IF [Free Time] > 2 Hours
THEN
IF [Energy] = “A Lot”
THEN “Swim”
ELSEIF [Energy] = “Not a Lot”
THEN “Write”
END
ELSEIF [Free Time] < 2 Hours
THEN
IF [Energy] = “A Lot”
THEN “Quick Jog”
ELSE “Crochet”
END
END
Avoiding Using/Writing Nested IF Statements
Like I mentioned previously, there are valid reasons for avoiding writing or using them. They’re not as performative as simpler IF statements due to querying each row of data twice (especially problematic for large datasets with millions of rows), and they’re also likely harder to understand—and troubleshoot—for both the one writing it and the one reading it. You can avoid them by breaking down a nested IF statement into multiple calculations (i.e., building the smaller components into their own calculated fields and finally bringing them together by referencing each of them in a final calculated field).
For example, if we return to our not-quite-real-world example, we could write the following calculated fields (note that each of the fields shares the word “Hobbies” to make them easier to find at once):
1. Hobbies – Lots of Free Time
IF [Energy] = “A Lot”
THEN “Swim”
ELSEIF [Energy] = “Not a Lot”
THEN “Write”
END
2. Hobbies – Not a Lot of Free Time
IF [Energy] = “A Lot”
THEN “Quick Jog”
ELSE “Crochet”
END
3. Hobbies – What to Do
IF [Free Time] > 2 Hours
THEN [Hobbies – Lots of Free Time]
ELSEIF [Free Time] < 2 Hours
THEN [Hobbies – Not a Lot of Free Time]
END
If you name your calculated fields well, you won’t even need to put your cursor in it to preview the code, in order to understand what this part is doing, which saves you a lot of time.
Another (Not Recommended) Way to Avoid Using/Writing Nested IF Statements
Another way you could get around nested IF statements, which I do not recommend, though it might help you understand just how many conditions you may be playing around with, is to bundle each of the conditions together.
In the not-quite-real-world example, we have two criteria at play: the amount of free time and the amount of energy, each with two values, resulting in four possibilities:
You could write an IF statement with the four conditions, but it’d get confusing fast with all the <, >, =, and other operators (plus, this is only a 2x2; imagine you had more conditions to account for!):
IF [Free Energy] > 2 Hours AND [Energy] = “A Lot”
THEN “Swim”
ELSEIF [Free Energy] > 2 Hours AND [Energy] = “Not A Lot”
THEN “Write”
ELSEIF [Free Energy] < 2 Hours AND [Energy] = “A Lot”
THEN “Quick Jog”
ELSEIF [Free Energy] < 2 Hours AND [Energy] = “Not A Lot”
THEN “Crochet”
END
That’s how I began trying to figure out a way to understand nested IF statements by myself, actually. It’s a lot of effort and time, frankly, for something that isn’t worth it—but it did help me understand how nested IF statements are optimized for these kinds of situations; sometimes you have to do things the slow or inefficient way to understand why the fast and efficient way is the fast and efficient way. (Also, when I finally thought to draw it all out, I understood it almost immediately, which is why I started this blog post with the tree diagram.)
Anyway, that’s all I have for you now, hope you found it helpful :)