


Parameters are extremely useful functions we can use in Tableau. Parameters are used to quickly change the information shown in your worksheets and dashboards. It essentially allows for user interactivity, similar to filtering.
Examples of a Parameter:


Limiting data shown by a desired amount. (Top N items, Bottom N items)
This parameter can allow the user to freely determine how much information will be shown in a sheet. This is especially useful when certain sheets contain many rows of data.
Example:

With a simple TOP N parameter, the amount of products can be freely configured.

Using the slider above the Marks panel, a user can freely use the slider (or type in) to determine how many products are shown.
To create this is very simple functionality :
- First, create a parameter. (This can be made by pressing the drop down menu next to the search bar near the top-left corner of the Data pane.


Alternatively, you can also create a parameter in the Filter menu as shown above.
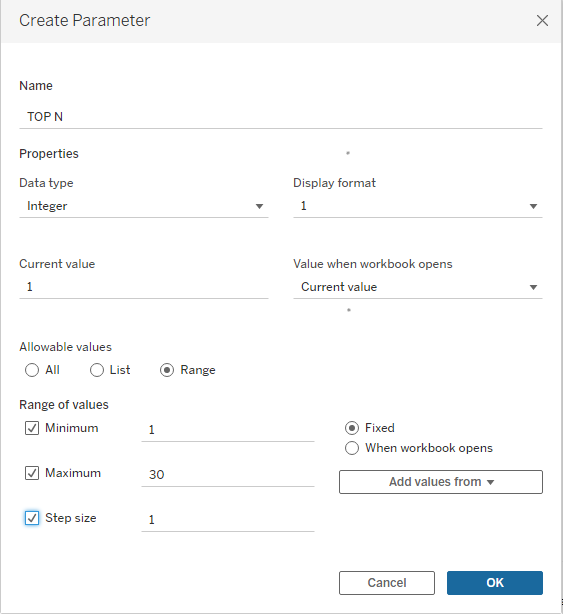
- Next we want to set the parameter itself. We want to pick a name for the Parameter as well as changing the parameter to an Integer.

Keep in mind that in the allowable values section of the parameter menu, you can technically select All, and the parameter will still work, but we want to limit the maximum, (and possibly minimum) amount of items on the sheet so instead we will select Range, and set the minimum to 1 and maximum to 30. (These values can be changed in a later time, if needed).
- We will press OK and next we need to create a calculated field, which we can also do in the same way as creating a parameter (see below)

Instead of selecting Create Parameter, we want to select Create Calculated Field.

We will type the formula as shown above.
- Afterwards, with both our Parameter and Calculated Field created, we have to place them in the right places.
Drag the Calculated Field into the Filter Pane and set the filter to True. This allows only the amount of items designated by the user will be displayed.

- Finally we will right click on our parameter and select show parameter. Now our parameter is complete and working!
This is just one use of parameters. Knowing how to use parameters can help make your dashboard more interactive, more user friendly, and certainly more interesting to use. Rather than having a static dashboard that answers some questions, making use of parameters can instead potentially answer a lot more questions with a simple change in parameters!