


With raw JSON data stored in an S3 bucket, the next stage of your ELT process will likely be bringing that data into your data warehouse (in my case, Snowflake). While you could write another python script to periodically pull those files and load them, an alternative approach is setting up a secure, event-driven pipeline where Snowflake loads new files the moment they land in S3.
Doing this requires two main pieces: establishing a secure cross-cloud connection (IAM roles and Storage Integrations) and configuring the automated loading pipeline (Snowpipe and S3 Event Notifications). Here is how to set this up:
Part 1: Establishing Secure Cross-Cloud Access
Before Snowflake can read anything from S3, you need to grant it access without hardcoding or storing raw AWS passwords. For this we use an AWS IAM Role paired with a Snowflake Storage Integration to establish a secure trust relationship.
1. Create the AWS IAM Policy and Role
In the AWS Console, start by creating a policy that defines exactly what Snowflake is allowed to do in your bucket.
S3 Permissions: Grant ListBucket, GetObject, PutObject, DeleteObject, and ListBucketMultipartUploads.
KMS Permissions: If your bucket uses AWS KMS keys for encryption, explicitly add Encrypt, Decrypt, and GenerateDataKey permissions so Snowflake can unencrypt the files.
Resource Scope: Attach your bucket ARN (e.g., arn:aws:s3:::your-bucket-name) and append /* if you want to allow access to all subfolders inside it. If you only want to allow access to a specific folder with s3 then provide the path to that folder again with /* trailing to allow access to the files within.
Next, create a new IAM Role. Set the trusted entity type to AWS Account and enter a placeholder value like '0000' for the External ID (Snowflake will generate the real ID in the next step). Attach the policy you just created to this role.
2. Build the Storage Integration in Snowflake
In Snowflake, create a Storage Integration. This object handles authentication using AWS IAM credentials rather than static access keys.
CREATE STORAGE INTEGRATION your_project_storage_integration
  TYPE = EXTERNAL_STAGE
  STORAGE_PROVIDER = S3
  ENABLED = TRUE
  STORAGE_AWS_ROLE_ARN = 'arn:aws:iam::123456789012:role/your-iam-role'
  STORAGE_ALLOWED_LOCATIONS = ('s3://your-bucket-name');
Once created, run DESC INTEGRATION your_project_storage_integration; and look for two specific outputs:
- STORAGE_AWS_IAM_USER_ARN
- STORAGE_AWS_EXTERNAL_ID
3. Update the AWS Trust Policy
Take those two values back to your AWS IAM Role, edit its Trust Relationship policy, and replace the placeholder values. This locks down the role so that only your specific Snowflake instance is authorized to assume it.
Part 2: Building the Automated Ingestion Pipeline
With security handled, you can set up the database objects and automated trigger.
1. Create the Stage and Landing Table
In Snowflake, create an external stage referencing your storage integration, along with a raw table to hold the incoming JSON payloads.
-- Create the Stage
CREATE OR REPLACE STAGE your_project_stage
  URL = 's3://your-bucket-name'
  STORAGE_INTEGRATION = your_project_storage_integration
  FILE_FORMAT = (
    TYPE = 'JSON'
    ALLOW_DUPLICATE = FALSE
    STRIP_OUTER_ARRAY = TRUE
  );

-- Create the Landing Table
CREATE TABLE your_project_raw (
  json_data VARIANT,
  filename STRING
);
2. Define the Snowpipe
Snowpipe is Snowflake's continuous loading service. It wraps around a standard COPY INTO command and waits for an external event to trigger it.
CREATE OR REPLACE PIPE your_project_snowpipe
  AUTO_INGEST = TRUE
AS
COPY INTO your_project_raw
FROM (
  SELECT $1, metadata$filename -- Brings in json and the filename from metadata.
  FROM @bike_point_stage
)
FILE_FORMAT = (
  TYPE = 'JSON'
  ALLOW_DUPLICATE = FALSE
  STRIP_OUTER_ARRAY = TRUE
);
3. Connect S3 Event Notifications to Snowpipe
Run SHOW PIPES; in Snowflake and copy the string listed under the notification_channel column. This is an Amazon SQS Queue ARN automatically created by Snowpipe.
Finally, navigate to your S3 bucket in the AWS Console:
- Go to Properties / Event Notifications / Create event notification.
- Select event types for Object Create (such as
s3:ObjectCreated:Put). - Set the destination to SQS Queue and paste in the ARN you copied from Snowflake.
How It Works
Once this loop is closed, your ingestion pipeline becomes completely automated:
- Your Python extraction script drops a raw JSON file into your S3 bucket.
- S3 sends an event notification to the SQS queue managed by Snowpipe.
- Snowpipe detects the notification, pulls the file from the stage, and loads the data into the
your_project_rawtable. - Snowpipe automatically tracks file metadata so it never loads the same file twice, even if it remains in your bucket.
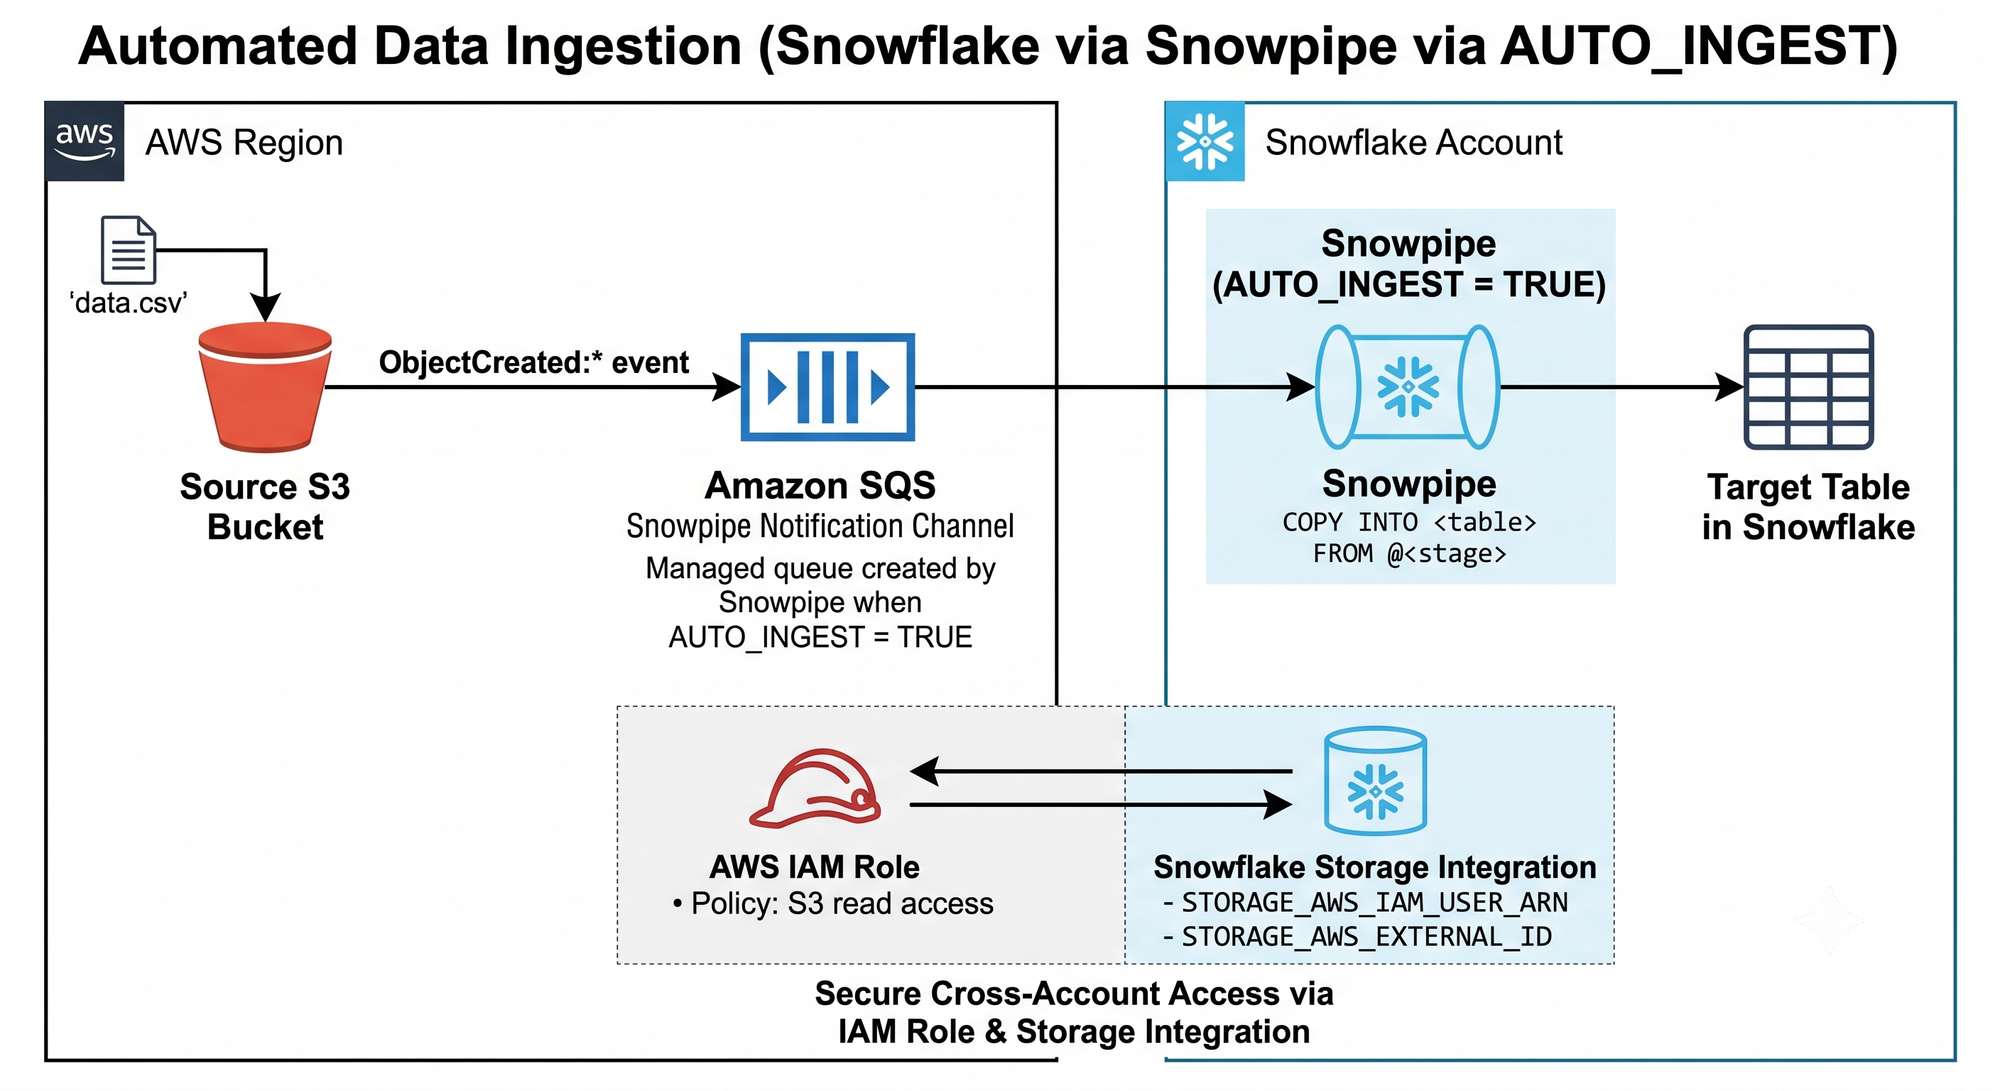
From a cost standpoint, Snowpipe operates on a simple pay-as-you-use model based on a fixed credit rate per gigabyte of uncompressed data processed, making it an efficient, hands-off solution for continuous landing zones. There may be other ingestion methods which would suit your pipeline better, for example a time based trigger set at regular intervals could be a less expensive way if there is no need to have the data immediately ready in Snowflake - but Snowpipe is a great method should you need the data to be uploaded quickly and securely.