Generate Rows is not only a useful tool, it is also one of the additional tools, that are requested for the alteryx advanced certification and especially, its also one of my favorites, as you can make seemingly complex things very easy. I want not only to give an introduction to the tool ( in this blog ), I also want to show you two cases, where this tool comes in super handy ( in the next blog ). I also believe, that understanding this tool and these two examples can be very helpful for the advanced certification.
As the name says, the tool generates rows, and as the incoming connection port shows, you can also generate rows without any incoming connection. This tool is actually a translation of a loop tool from a programming language and you could also build an iterative makro – but using one single tool is of course much more easy.
Let’s first look at the configuration of the tool (without an incoming connection):

First, you have the possibility to update an existing field or to create a new one ( when you don’t have an incoming connection, your only chance is of course to create a new one ). As usual, you can select a name, choose the data type of the field and for some data types, choose the size of them.
Then the interesting part comes:
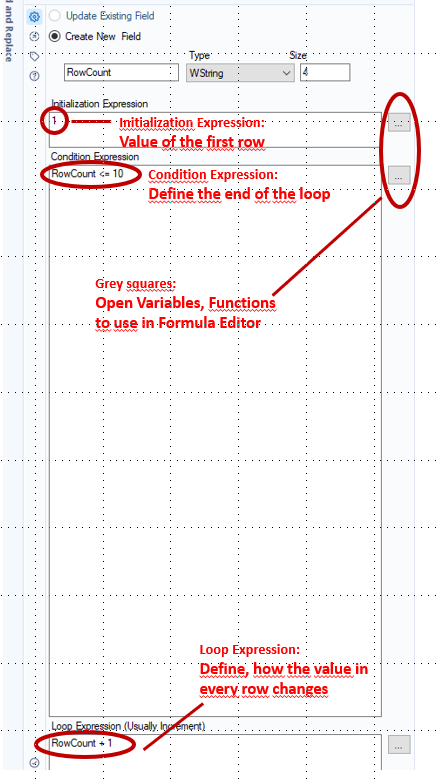
The "Initialization Expression" field shows, what will be in your first row. The default value is 1. Over the grey square right to the “Initialization Expression” you can choose variables ( field names ), that you want to use as initialization expression ( of course again, they will just be provided if you have an incoming connection ).
The next part is the Condition Expression. Here you have to define the condition to which fulfilling the tool will generate rows. Again you can click on the grey square to use variables, functions and saved expressions and you have an expression editor here (unfortunately, there is no field recognition, as in the formula tool, provided).
The last part of the configuration is the Loop Expression. Here you define, how your value from the first row, which you set in the field “Initialization Expression”, increases. Here you simply give the name of the new field (the default one is RowCount)and the value by which it should increase, for example “RowCount + 1”- which is also the default expression.
So for example, if you want to have a column with ten rows, counting from 1-10, your initialization expression is 1, your condition is: "RowCount <= 10". As you only want to create ten rows, you have to define that ending condition, that alteryx stops producing rows after having created ten of them; and your loop expression is “RowCount + 1” so that the value increases by one from row to row.
So without any incoming connection you create a column with the amount of rows you define and with the values you define. Of course you can not only create 1,2,3,4 and so on, but you can create values, as complex and complicated as you want, as you can use almost all functions, which are also provided in the formula tool in the condition expression and in the loop expression.
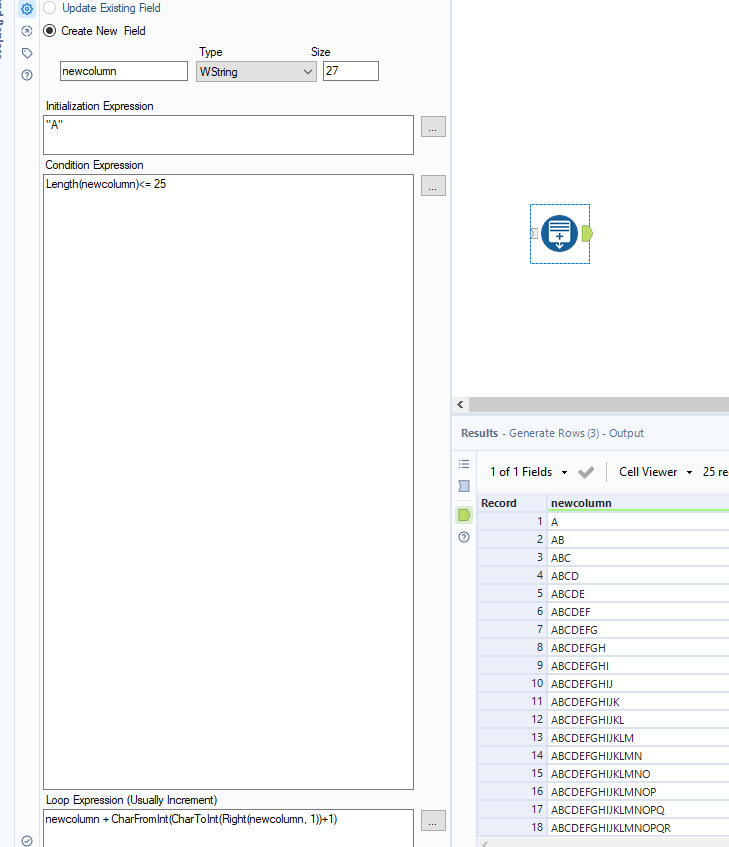
That means, you can also work with strings and even with spatial objects. So another simple example with a string expression could be, that you want to increase the number of letters from A to Z per row. In the first row, we want an A, in the second AB, in the third ABC and so on (I don’t know, for what this could be useful, but I’m sure, there is a case!). This goal you can achieve with the help of the functionality of “CharToInt” and “CharFromInt”, which converts a letter to its Unicode character and vice versa. After converting the letter to a number, we can increase the number by one and convert it back, what results in the next letter in the alphabet. This is the configuration:
In the next blog, I want to introduce you to two use cases, which are very good to know and also good to understand the tool better.
